WireGuard: Site-to-Site VPN to Replace Your MPLS
Deploy WireGuard site-to-site to replace your MPLS. Full guide: installation, peer configuration, inter-VLAN routing on Ubuntu.

At BOTUM, when a client asks how to securely connect their offices without paying a fortune for MPLS, the answer is almost always the same: WireGuard. This modern VPN protocol is a revolution — 4,000 lines of code versus 100,000 for OpenVPN, performance that beats IPSec in most real-world scenarios, and a configuration that fits on a single page. This guide shows you how to deploy a complete site-to-site VPN between two or three offices with a central hub server.
Why WireGuard Over OpenVPN or IPSec?
The question comes up constantly in our network audits. OpenVPN has been around since 2001 and gets the job done, but its massive codebase and layered TLS protocol generate measurable latency. IPSec is powerful but its configuration is a nightmare — I've seen it block projects for weeks. WireGuard, on the other hand, runs directly in the Linux kernel since version 5.6 (2020).
- Performance: WireGuard uses ChaCha20-Poly1305, faster than AES on processors without AES-NI hardware acceleration
- Simplicity: one key pair, one config file — that's it
- Security: minimal attack surface — 4,000 audited lines vs 100,000+ for OpenVPN
- Reconnection: WireGuard resumes in milliseconds after a network interruption (ideal for remote workers)
- Kernel-space: no userspace TUN/TAP, reduced latency, maximum throughput
- Modern cryptography: Curve25519, ChaCha20, Poly1305, BLAKE2s — no weak algorithms
⚠️ Warning: WireGuard is an excellent choice for enterprise deployments, but it doesn't hide metadata (source/destination IPs). If complete anonymity is required, look at Tor or i2p. For enterprise infrastructure, WireGuard is perfect.
Architecture and Prerequisites
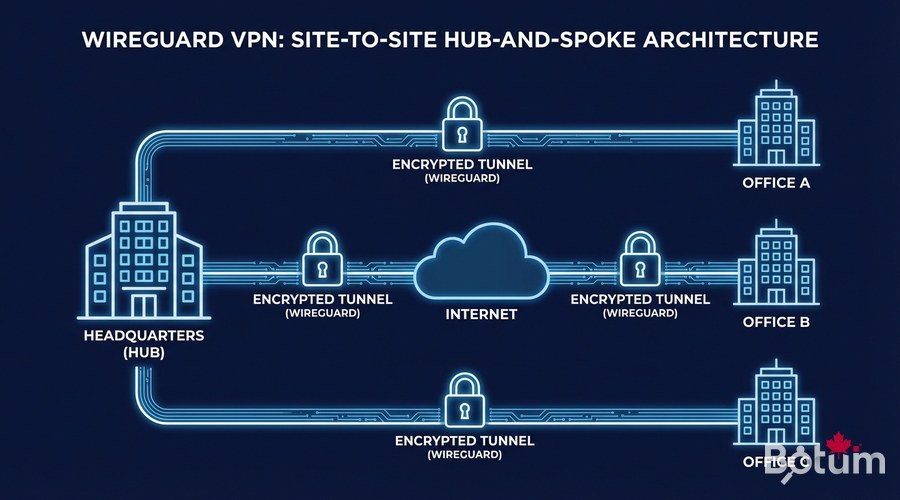
We'll deploy a hub-and-spoke model: a central server (your VPS or dedicated server) that receives connections from the different sites. This is the simplest topology to maintain and the most robust in production.
- Hub Server: Ubuntu 22.04+ VPS with a fixed public IP, 1 vCPU / 512 MB RAM is sufficient
- Office A: Ubuntu/Debian server with Internet access (NAT OK, dynamic IP OK)
- Office B: same
- Ports: UDP 51820 open on the Hub (cloud firewall/security group)
- Root or sudo access on all machines
WireGuard Installation
On Ubuntu 22.04 / 24.04
WireGuard has been in the official repositories since Ubuntu 20.04. Installation takes 30 seconds:
# On ALL machines (Hub + Office A + Office B)
sudo apt update && sudo apt install -y wireguard wireguard-tools

# Verify the installation
wg --version
# → wireguard-tools v1.0.20210914 - https://www.wireguard.com
Generate Key Pairs
Each machine has its own key pair. Never share the private key — it never leaves the machine it was generated on.
# On EACH machine, generate the key pair
wg genkey | sudo tee /etc/wireguard/privatekey | wg pubkey | sudo tee /etc/wireguard/publickey

# Secure the private key
sudo chmod 600 /etc/wireguard/privatekey

# Display the keys (note them carefully)
echo "Private key: $(sudo cat /etc/wireguard/privatekey)"
echo "Public key: $(sudo cat /etc/wireguard/publickey)"

# Generate a Pre-Shared Key (PSK) for additional security
# (optional but recommended — do this on the Hub)
wg genpsk | sudo tee /etc/wireguard/presharedkey
sudo chmod 600 /etc/wireguard/presharedkey
Configuring the Hub Server
The Hub is the heart of the network. It accepts connections from both offices and routes traffic between them. Replace
sudo nano /etc/wireguard/wg0.conf[Interface]
# Hub server's private key
PrivateKey = <HUB_PRIVATE_KEY>
# WireGuard tunnel IP for this server
Address = 10.10.0.1/24
# Listening port
ListenPort = 51820
# Enable IP forwarding (inter-site routing)
PostUp = iptables -A FORWARD -i wg0 -j ACCEPT; iptables -A FORWARD -o wg0 -j ACCEPT; iptables -t nat -A POSTROUTING -o eth0 -j MASQUERADE; sysctl -w net.ipv4.ip_forward=1
PostDown = iptables -D FORWARD -i wg0 -j ACCEPT; iptables -D FORWARD -o wg0 -j ACCEPT; iptables -t nat -D POSTROUTING -o eth0 -j MASQUERADE
# ─── Peer: Office A ──────────────────────────────────────
[Peer]
# Office A's public key
PublicKey = <OFFICE_A_PUBLIC_KEY>
# Optional PSK for double protection
PresharedKey = <PSK_OFFICE_A>
# WireGuard IP assigned to Office A + its LAN network
AllowedIPs = 10.10.0.2/32, 192.168.1.0/24
# Keepalive to maintain tunnel through NAT
PersistentKeepalive = 25
# ─── Peer: Office B ──────────────────────────────────────
[Peer]
PublicKey = <OFFICE_B_PUBLIC_KEY>
PresharedKey = <PSK_OFFICE_B>
AllowedIPs = 10.10.0.3/32, 192.168.2.0/24
PersistentKeepalive = 25# Make IP forwarding permanent (otherwise routing stops after reboot)
echo 'net.ipv4.ip_forward=1' | sudo tee -a /etc/sysctl.conf
sudo sysctl -p
# Start WireGuard
sudo systemctl enable --now wg-quick@wg0
# Check status
sudo wg show
sudo systemctl status wg-quick@wg0Configuring Office A
[Interface]
PrivateKey = <OFFICE_A_PRIVATE_KEY>
# This office's WireGuard IP in the tunnel
Address = 10.10.0.2/24

[Peer]
# Hub's public key
PublicKey = <HUB_PUBLIC_KEY>
PresharedKey = <PSK_OFFICE_A>
# Hub's public IP and port
Endpoint = <HUB_PUBLIC_IP>:51820
# Routes to send through the tunnel:
# - WireGuard network 10.10.0.0/24
# - Office B's LAN network
AllowedIPs = 10.10.0.0/24, 192.168.2.0/24
PersistentKeepalive = 25
# Start + enable on boot
sudo systemctl enable --now wg-quick@wg0
# Connectivity test
ping -c 3 10.10.0.1 # Hub
ping -c 3 10.10.0.3 # Office B
ping -c 3 192.168.2.1 # Office B Gateway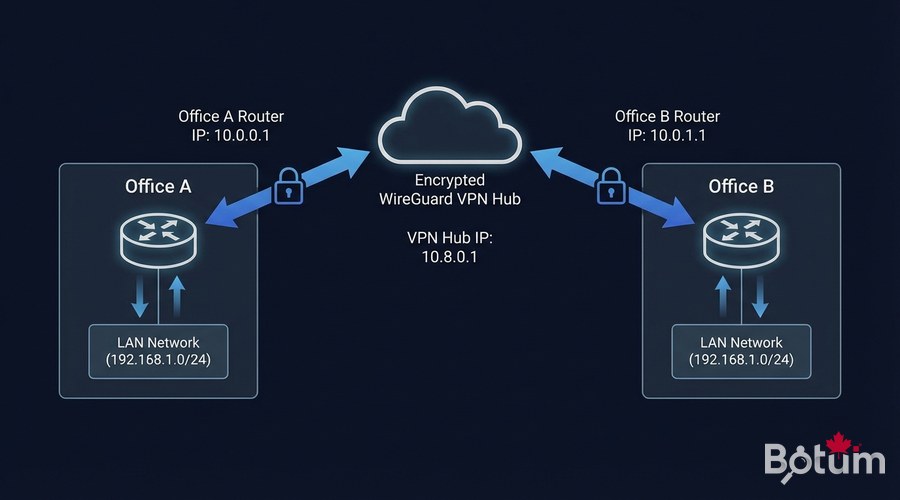
Monitoring and Troubleshooting
# Complete tunnel status (peers, handshakes, traffic)
sudo wg show

# Check active routes
ip route show table all | grep wg0

# Latency test
ping -c 10 10.10.0.3

# System logs (if there's an issue)
journalctl -u wg-quick@wg0 -f

# Restart tunnel without losing config
sudo wg-quick down wg0 && sudo wg-quick up wg0

# Monitor traffic in real-time
sudo watch -n 1 wg show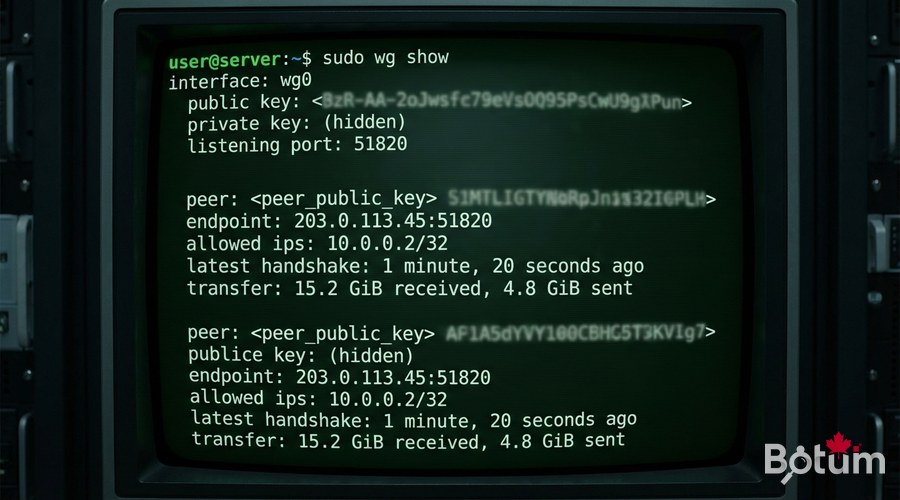
Advanced Security
# UFW Firewall on the Hub — expose only the minimum
sudo ufw allow 51820/udp comment 'WireGuard'
sudo ufw allow from <ADMIN_IP> to any port 22 comment 'SSH admin only'
sudo ufw default deny incoming
sudo ufw default allow outgoing
sudo ufw enable
💡 Tip: Rotate your Pre-Shared Keys every 90 days. A cron script can automate this — wg syncconf allows live config reload without dropping tunnels.

Next Steps
- Install an OPNsense or PFSense firewall in front of the Hub for advanced filtering
- Configure a DIY SD-WAN with WireGuard + OPNsense for QoS traffic prioritization
- Add a web interface with wg-easy for non-technical team members
- Automate key rotation with cron scripts
- Explore VLAN segmentation to isolate networks by function
Download this guide as a PDF to read offline.
⬇ Download the guide (PDF)🚀 Go Further with BOTUM
This guide covers the essentials. In production, every environment has its own specifics. BOTUM teams accompany organizations through deployment, advanced configuration, and infrastructure hardening. If you have a project, let's talk.
Discuss your project →