Self-Hosted High Availability: Backups, Snapshots and Recovery
Complete backup strategy for self-hosted infrastructure: 3-2-1 rule, Proxmox snapshots, Docker backups, rclone to Backblaze B2, and restoration testing.
The best self-hosted infrastructure is one that holds up when things go wrong. In this final article of the series, I'll show you BOTUM's complete backup strategy: the 3-2-1 rule, Proxmox snapshots, Docker backups, and most importantly — restoration testing, the step everyone forgets.
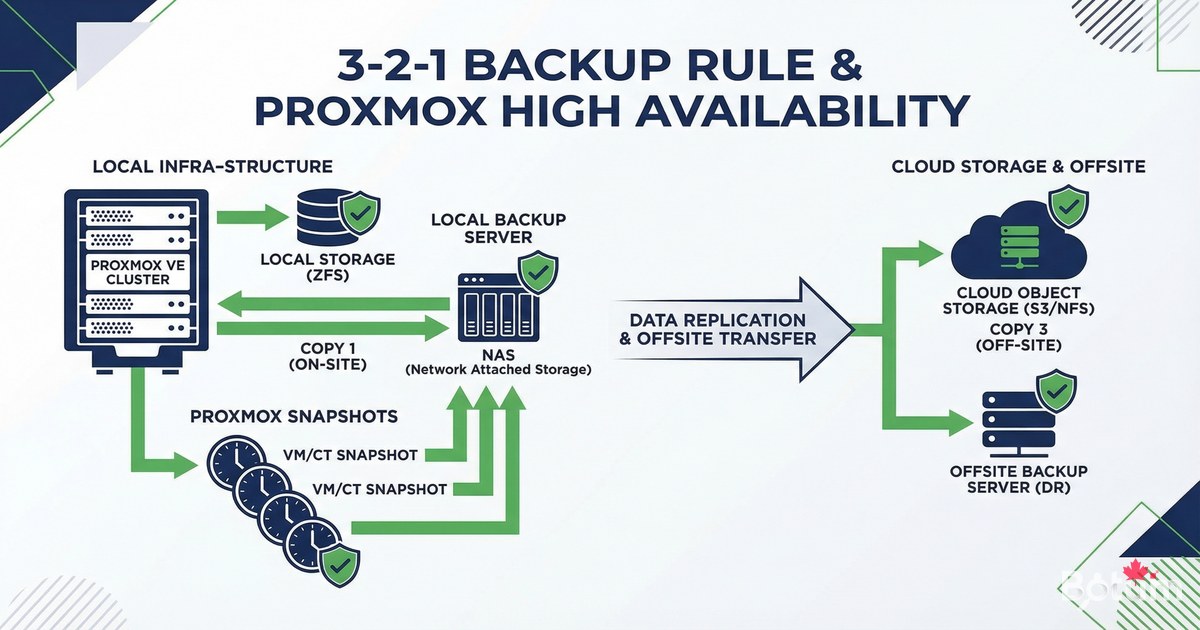
The 3-2-1 Rule — The Foundation of Every Backup Strategy
The 3-2-1 rule is the industry standard for backups. Simple and effective:
- 3 copies of your data (original + 2 backups)
- 2 different storage media (e.g., local SSD + NAS)
- 1 offsite copy (cloud, other building)
- The offsite copy protects against fire, theft, flooding
- Restoration testing proves your backups actually work
For a typical self-hosted infrastructure: active data (server SSD) + local backup (NAS or second disk) + cloud backup (Backblaze B2, AWS S3, or rclone to any cloud).
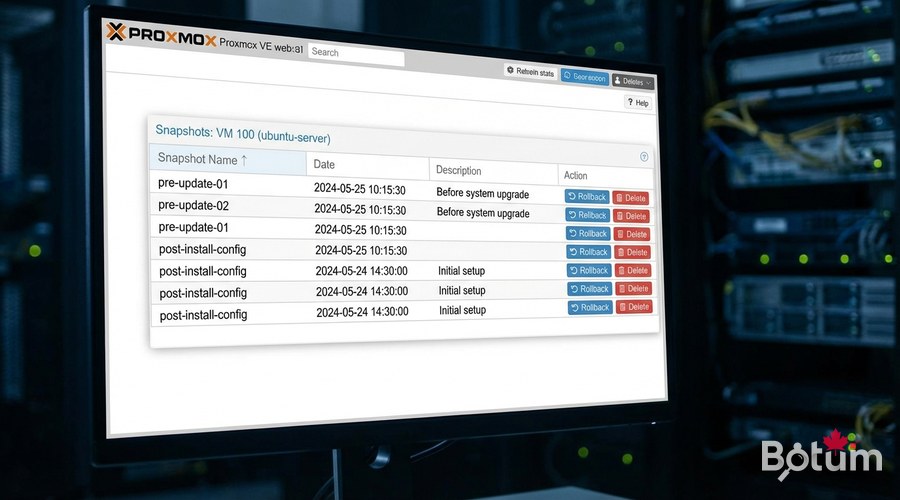
Proxmox Snapshots — Instant VM Backups
Proxmox snapshots save the complete state of a VM (disk + optional RAM) in seconds. Ideal before a major update or risky configuration change.
# Create a snapshot via Proxmox CLI:
qm snapshot <VMID> <snapshot-name> --description "Description"
# Example:
qm snapshot 101 before-kernel-upgrade --description "Before kernel 6.8"

# List snapshots:
qm listsnapshot 101

# Restore a snapshot (VM must be stopped):
qm stop 101
qm rollback 101 before-kernel-upgrade
qm start 101

# Delete a snapshot:
qm delsnapshot 101 before-kernel-upgrade

# Scheduled backup (Proxmox cron):
# Datacenter > Storage > Backup > Add
# Schedule: daily at 2:00 AM
# Mode: Snapshot or Stop (more consistent)
# Retention: keep last 7 backups
Proxmox Backup Server (PBS) — Deduplicated Backups
Proxmox Backup Server is Proxmox's official backup tool. It offers deduplication, compression, and incremental backups — drastically reducing required disk space.
# Install PBS on a dedicated server (or VM):
# 1. Download PBS ISO from proxmox.com/downloads
# 2. Install on a separate machine (recommended)
# 3. In Proxmox VE > Datacenter > Storage > Add > Proxmox Backup Server
#    Server: your-PBS-IP
#    Datastore: PBS datastore name
#    Fingerprint: (copy from PBS)

# Create a backup job in Proxmox VE:
# Datacenter > Backup > Add
# Storage: your-PBS
# Schedule: daily at 2:00 AM
# Selection: include all VMs
# Mode: Snapshot (no stop) or Suspend (brief stop)
# Retention: 7 daily, 4 weekly, 3 monthly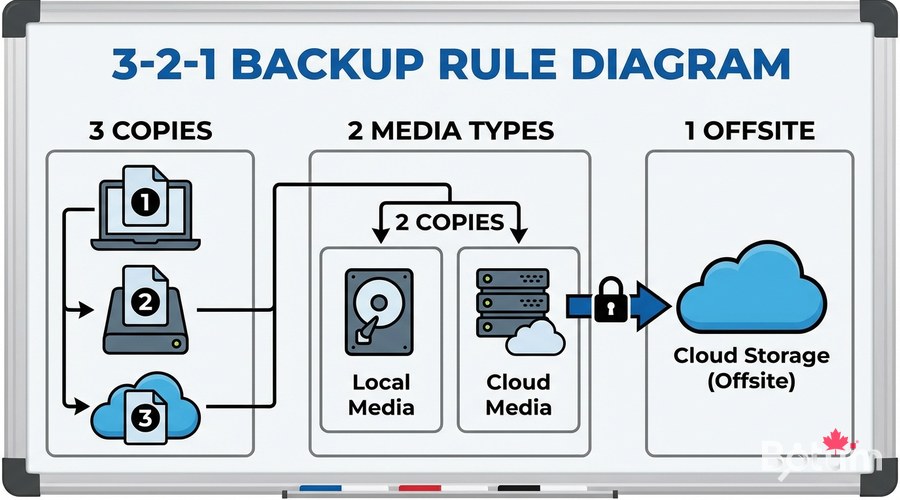
Docker Volume Backups
For Docker services running outside Proxmox (or on a VPS), here's the volume backup strategy:
#!/bin/bash
# Complete Docker backup script to NAS + Cloud

BACKUP_LOCAL="/mnt/nas/backups/docker/$(date +%Y-%m-%d)"
BACKUP_LOG="/var/log/docker-backup.log"
mkdir -p "$BACKUP_LOCAL"

backup_service() {
    local name="$1"
    local path="$2"
    echo "$(date): Backup $name" | tee -a "$BACKUP_LOG"
    tar czf "${BACKUP_LOCAL}/${name}-$(date +%Y%m%d).tar.gz" "$path"         2>> "$BACKUP_LOG" && echo "OK: $name" || echo "ERROR: $name"
}

# Ghost Blog (no stop needed for SQLite)
backup_service "ghost" "/mnt/docker-data/ghost-blog/content"

# Vaultwarden (brief stop recommended)
docker stop vaultwarden 2>/dev/null
backup_service "vaultwarden" "$HOME/docker/vaultwarden/data"
docker start vaultwarden 2>/dev/null

# Uptime Kuma
backup_service "uptime-kuma" "$HOME/docker/uptime-kuma/data"

# Sync to cloud with rclone
rclone sync "$BACKUP_LOCAL" "b2:my-backup-bucket/docker/$(date +%Y-%m-%d)/"     --log-file="$BACKUP_LOG"

# Clean backups older than 30 days
find /mnt/nas/backups/docker -maxdepth 1 -type d -mtime +30 -exec rm -rf {} +
Configure rclone for Backblaze B2
# Install rclone:
curl https://rclone.org/install.sh | sudo bash

# Configure Backblaze B2:
rclone config
# > New remote (n)
# > Name: b2
# > Provider: Backblaze B2
# > account: your-application-key-id
# > key: your-application-key
# > Save

# Create B2 bucket:
rclone mkdir b2:my-backup-bucket

# Test sync:
rclone sync /backup/test/ b2:my-backup-bucket/test/ --progress

# Check bucket contents:
rclone ls b2:my-backup-bucket/

# Backblaze B2 costs: ~$0.006/GB/month (very affordable)
Restoration Testing — The Critical Step
An untested backup is not a backup — it's wishful thinking. Test your restorations regularly on a test VM:
# Proxmox restoration test (test VM):
# 1. Proxmox: Datacenter > Backup > select a backup > Restore
# 2. Choose a different VM ID (e.g., 999 for tests)
# 3. Restore to test storage
# 4. Start test VM
# 5. Verify services are operational

# Docker restoration test (on separate VM):
# 1. Create a new Ubuntu test VM
# 2. Install Docker
# 3. Copy backup from NAS or cloud

# Restore Ghost Blog:
mkdir -p /test/ghost-blog/content
tar xzf /backup/ghost-20260312.tar.gz -C /test/ghost-blog/content/
# Start Ghost on port 2368 of the test VM
# Verify the blog is readable

# Restore Vaultwarden:
mkdir -p /test/vaultwarden/data
cp /backup/vaultwarden-20260312.db /test/vaultwarden/data/db.sqlite3
# Start Vaultwarden and verify access

echo "Restoration test successful!" 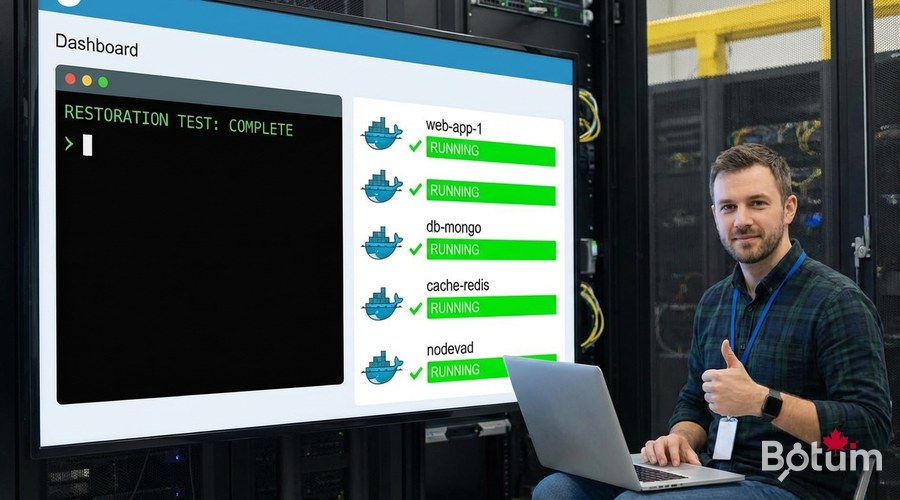
Backup Integrity Monitoring
#!/bin/bash
# /usr/local/bin/check-backups.sh
BACKUP_DIR="/mnt/nas/backups/docker"
MAX_AGE_HOURS=25

LAST_BACKUP=$(find "$BACKUP_DIR" -maxdepth 1 -type d -name "20*" | sort | tail -1)

if [[ -z "$LAST_BACKUP" ]]; then
    echo "ERROR: No backup found"
    exit 1
fi

BACKUP_AGE=$(( ($(date +%s) - $(stat -c %Y "$LAST_BACKUP")) / 3600 ))

if (( BACKUP_AGE > MAX_AGE_HOURS )); then
    echo "ALERT: Last backup is ${BACKUP_AGE}h old"
fi

for f in "$LAST_BACKUP"/*.tar.gz; do
    if ! tar tzf "$f" > /dev/null 2>&1; then
        echo "ERROR: Corrupt archive: $f"
    fi
done

echo "Backup check OK - Last: $LAST_BACKUP (${BACKUP_AGE}h ago)"
Recovery Plan (RTO/RPO)
A good recovery plan defines exactly what to do in case of disaster, in what order, and how long it takes:
- RTO (Recovery Time Objective): maximum acceptable time to restore service
- RPO (Recovery Point Objective): maximum acceptable data loss (e.g., 24h with daily backup)
- Document each service: IP, ports, dependencies, restoration commands
- Maintain an updated runbook: ordered list of restoration steps
- Test the recovery plan at least once a year (disaster drill)
High Availability with Proxmox Cluster
# For HA (high availability) level with Proxmox:
# Minimum: 3 Proxmox nodes + shared storage (Ceph or NFS)

# Create a Proxmox cluster (on the main node):
pvecm create my-cluster

# Join the cluster (on other nodes):
pvecm add MAIN-NODE-IP

# Check cluster status:
pvecm status
pvecm nodes

# Enable HA for a VM:
# Datacenter > HA > Add
# VM ID: 101
# Max restart: 3
# Max relocate: 3

# When a node fails, HA VMs automatically
# migrate to an available node.
Series Conclusion
Congratulations! You now have a complete and professional self-hosted infrastructure: Proxmox virtualization, Docker containerization, Zoraxy SSL reverse proxy, Vaultwarden password management, Uptime Kuma monitoring, automation, and backups.
This series showed you exactly how the BOTUM infrastructure is built. Self-hosting is no longer reserved for experts — with these tools, anyone can manage their infrastructure like a professional. Good luck in your self-hosting adventure!
Download this guide as a PDF to read offline.
⬇ Download the guide (PDF)🚀 Go Further with BOTUM
This guide covers the essentials. In production, every environment has its own specifics. BOTUM teams accompany organizations through deployment, advanced configuration, and infrastructure hardening. If you have a project, let's talk.
Discuss your project →