DIY SD-WAN: Replace MPLS with WireGuard + OPNsense
Build your own SD-WAN with WireGuard + OPNsense. Hub-and-spoke, QoS, multi-WAN failover. Save $43,200/year vs MPLS.

An operator is offering you a managed SD-WAN link at $800/month? With WireGuard and OPNsense, you can build exactly the same thing for under $50/month in infrastructure costs. This guide is the result of several real-world deployments at multi-site SMEs that abandoned their MPLS links. I'll show you how to build a production-ready DIY SD-WAN.
SD-WAN: Demystifying the Concept
SD-WAN (Software-Defined Wide Area Network) allows you to intelligently manage multiple Internet connections (fiber, 4G, DSL) — automatically fail over if a link goes down, prioritize critical traffic (voice, video), and securely connect multiple sites. What operators sell for $2,000/month is fundamentally just intelligent routing over VPN tunnels.
- Link aggregation: use fiber + 4G simultaneously for more bandwidth
- Automatic failover: sub-1-second switchover if a link drops
- Intelligent QoS: prioritize Teams/Zoom over background downloads
- Visibility: unified dashboard for all links and sites
- Built-in security: end-to-end encryption between all sites

Our DIY SD-WAN Architecture
- WireGuard: high-performance encrypted inter-site VPN tunnels
- OPNsense: router/firewall with interface and QoS management
- Unbound DNS: internal DNS resolution for all sites
- Grafana + Prometheus: monitoring and alerting
- Ansible: automated deployment and configuration
Topology: one central VPS 'Hub' (€5-10/month) + OPNsense on a mini-PC in each office (€200-400 hardware, one-time cost). Compared to €800-2000/month for an operator SD-WAN offer, the ROI is immediate.
Step 1 — Prepare the Central Hub
# Hub installation (Ubuntu 22.04)
sudo apt update && sudo apt install -y wireguard wireguard-tools iptables-persistent

# Enable IP routing
echo 'net.ipv4.ip_forward=1' | sudo tee -a /etc/sysctl.conf
sudo sysctl -p

# Generate Hub keys
wg genkey | sudo tee /etc/wireguard/hub_private.key | wg pubkey | sudo tee /etc/wireguard/hub_public.key
sudo chmod 600 /etc/wireguard/hub_private.key
# /etc/wireguard/sdwan0.conf
[Interface]
PrivateKey = <HUB_PRIVATE_KEY>
Address = 172.16.0.1/16
ListenPort = 51820
PostUp = iptables -A FORWARD -i sdwan0 -j ACCEPT; iptables -A FORWARD -o sdwan0 -j ACCEPT; iptables -t nat -A POSTROUTING -o eth0 -j MASQUERADE
PostDown = iptables -D FORWARD -i sdwan0 -j ACCEPT; iptables -D FORWARD -o sdwan0 -j ACCEPT; iptables -t nat -D POSTROUTING -o eth0 -j MASQUERADE
[Peer]
# Site Paris
PublicKey = <PARIS_PUBLIC_KEY>
AllowedIPs = 172.16.1.0/24, 192.168.10.0/24
PersistentKeepalive = 25
[Peer]
# Site London
PublicKey = <LONDON_PUBLIC_KEY>
AllowedIPs = 172.16.2.0/24, 192.168.20.0/24
PersistentKeepalive = 25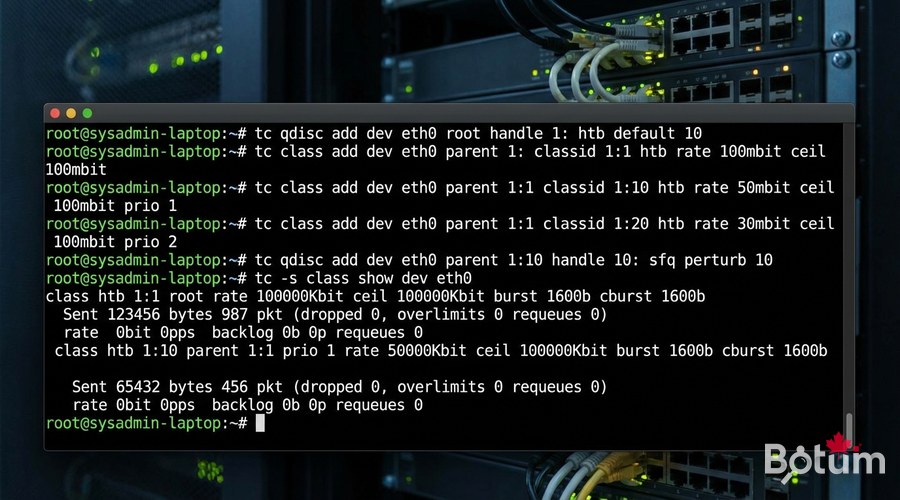
Step 2 — QoS and Traffic Prioritization
# OPNsense HFSC traffic shaping configuration
# Firewall → Traffic Shaper → Queues

# Queue 1: VOICE (highest priority)
# Type: HFSC, Bandwidth: 10% guaranteed / 40% max, Priority: 7

# Queue 2: MANAGEMENT (SSH, HTTPS admin)
# Type: HFSC, Bandwidth: 5% guaranteed / 20% max, Priority: 6

# Queue 3: BULK (downloads, backups)
# Type: HFSC, Bandwidth: 0% guaranteed / 80% max, Priority: 1

# Classification rules (Firewall → Traffic Shaper → Rules):
# SIP/RTP (port 5060, 5061, 10000-20000) → VOICE queue
# Teams/Zoom (known ports) → VOICE queue
# Port 22, 443 admin → MANAGEMENT queue
# Everything else → BULK queue
Step 3 — Multi-Link Automatic Failover
# OPNsense: System → Gateways
# GW_FIBER: WAN fiber interface, weight 1 (primary)
# GW_4G: 4G USB WAN interface, weight 5 (backup)

# Create gateway group:
# System → Gateways → Gateway Groups → Add
# Name: WAN_FAILOVER
# FIBER: Tier 1 (primary)
# 4G: Tier 2 (automatic backup)

# Health check configuration:
# Monitor IP: 8.8.8.8
# Probe interval: 500ms
# Loss threshold: 20%
# Latency threshold: 500ms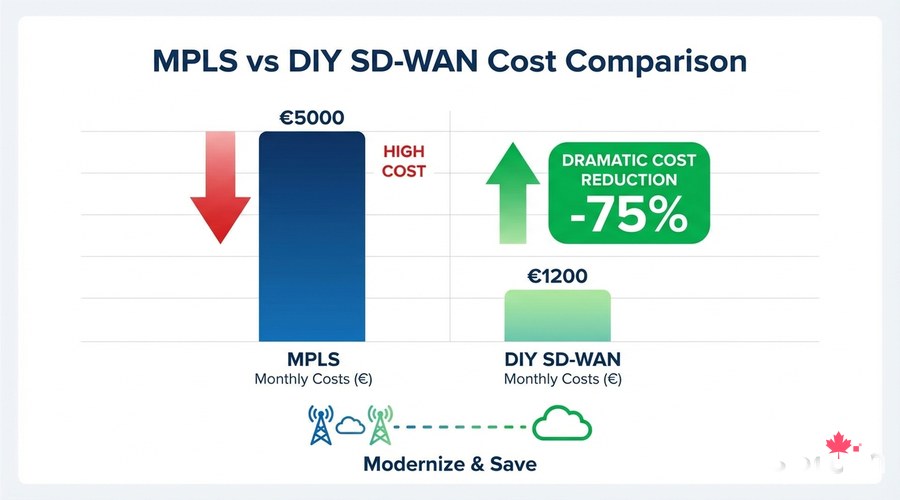
Step 4 — Monitoring with Grafana
# Install Telegraf for WireGuard metrics collection
sudo apt install -y telegraf

# /etc/telegraf/telegraf.d/wireguard.conf
[[inputs.wireguard]]
  devices = ["sdwan0"]

sudo systemctl enable --now telegraf
# Docker Compose — SD-WAN monitoring stack
version: '3.8'
services:
grafana:
image: grafana/grafana:latest
ports: ["3000:3000"]
volumes: [grafana_data:/var/lib/grafana]
environment:
- GF_SECURITY_ADMIN_PASSWORD=changeme
prometheus:
image: prom/prometheus:latest
ports: ["9090:9090"]
influxdb:
image: influxdb:2.0
ports: ["8086:8086"]
volumes:
grafana_data:
Real-World Results
- Monthly cost before (operator MPLS): €2,400/month
- Monthly cost after (DIY SD-WAN): €65/month (Hub VPS + bandwidth)
- Annual savings: > €27,000
- Inter-site throughput: went from 10 Mbps MPLS to 200 Mbps WireGuard
- Availability: 99.97% thanks to automatic 4G failover

Next Steps
- Add CrowdSec or Suricata IDS/IPS on OPNsense for intrusion detection
- Configure VLANs to isolate IoT, Management, and Production on each site
- Implement Zero Trust Network Access (ZTNA) on top of this SD-WAN
- Automate configuration with Ansible for new sites
- Set up PagerDuty/Telegram alerts for link outages
Téléchargez ce guide en PDF pour le consulter hors ligne.
⬇ Télécharger le guide (PDF)🚀 Aller plus loin avec BOTUM
Ce guide couvre les bases. En production, chaque environnement a ses spécificités. Les équipes BOTUM accompagnent les organisations dans le déploiement, la configuration avancée et la sécurisation de leur infrastructure. Si vous avez un projet, parlons-en.
Discuter de votre projet →