CrowdSec and fail2ban with OPNsense: Collaborative IDS/IPS and SSH Protection
Protect OPNsense with CrowdSec (collaborative IDS/IPS) and fail2ban on backend servers. os-crowdsec plugin, firewall bouncer, SSH/Nginx jails, complete integration.
On my BOTUM infrastructure, the OPNsense firewall blocks attacks at the perimeter. But the perimeter alone isn't enough. The servers behind the firewall — open SSH, Nginx as reverse proxy, web applications — are permanent targets for bots, scanners, and attackers trying to brute-force access. That's why I implemented an active IDS/IPS layer with CrowdSec at the OPNsense level, complemented by fail2ban on downstream servers — both integrated to share threat intelligence.
This post is the fifth and final in the OPNsense Enterprise Stack series. See: Post 1: Install OPNsense in Proxmox, Post 2: VLANs & Zero Trust, Post 3: WireGuard VPN & SD-WAN LTE, Post 4: WiFi & APs with UniFi/Omada.
Why Combine CrowdSec and fail2ban?
The two tools are complementary, not competitors:
- CrowdSec: collaborative IDS/IPS. It analyzes logs in real-time, detects malicious behavior, and shares blocked IPs with a global community. The OPNsense bouncer blocks these IPs at the firewall level, before packets even reach your servers. Powerful, but requires an OPNsense plugin and proper network architecture.
- fail2ban: local protection via log analysis. It bans IPs that fail too many times (SSH, Nginx, Postfix...) via iptables or nftables. Simple, battle-tested, effective for directly exposed services.
My strategy: CrowdSec blocks at the entrance (OPNsense firewall), fail2ban protects locally on each server, and both communicate via the CrowdSec API to enrich the threat database.

Prerequisites
- OPNsense operational — see Post 1
- OPNsense exposed to the internet (WAN with public IP or DDNS)
- Linux servers behind OPNsense (Ubuntu/Debian) with SSH enabled
- SSH admin access to backend servers
- A free account on app.crowdsec.net
Installing the CrowdSec Plugin on OPNsense
OPNsense offers the official os-crowdsec plugin via its plugin manager. This plugin installs the CrowdSec agent and firewall bouncer directly on the router.
# OPNsense GUI:
# System -> Firmware -> Plugins
# Search: crowdsec
# Find: os-crowdsec
# Click "+" to install

# After installation, reload the page.
# New menu: Services -> CrowdSec
Once installed, the CrowdSec interface appears in the Services menu. Verify the service is active:
# Services -> CrowdSec -> Overview
# CrowdSec daemon: Running
# Bouncer: Active

# Verification via SSH OPNsense:
# (System -> Shell or via admin SSH)
cscli version
# CrowdSec version: v1.x.x
cscli machines list
# Lists enrolled machines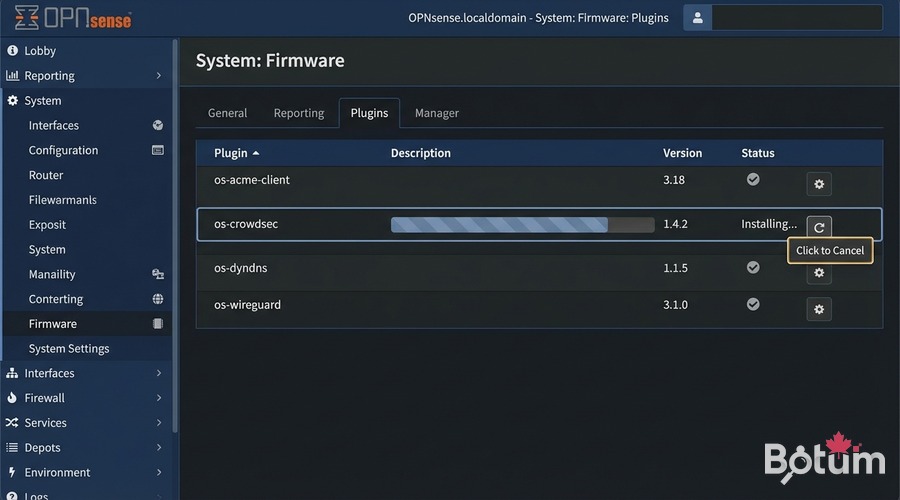
Configuring the OPNsense Bouncer (Firewall Bouncer)
The bouncer is the component that translates CrowdSec decisions into concrete firewall rules. On OPNsense, it integrates directly with the pf/nftables engine.
# Services -> CrowdSec -> Bouncers
# The "crowdsec-firewall-bouncer" must be listed
# Status: Running

# Bouncer configuration (file on OPNsense):
# /usr/local/etc/crowdsec/bouncers/crowdsec-firewall-bouncer.yaml

# Key parameters:
api_url: http://127.0.0.1:8080/
api_key: <automatically generated>
mode: pf   # OPNsense firewall mode
blacklists_ipv4: crowdsec_blacklists
blacklists_ipv6: crowdsec6_blacklists

# pf tables are automatically created and populated
# by the bouncer with malicious CrowdSec IPs
To verify the bouncer is working and blocking correctly:
# Via SSH OPNsense (System -> Shell):
cscli bouncers list
# Name              IP        Type     Decisions  Active
# opnsense-bouncer  127.0.0.1 firewall  active     true

# Check active decisions:
cscli decisions list
# IP              Reason               Duration  Source
# 185.220.x.x    crowdsecurity/ssh-bf  4h        CrowdSec CTI
# 45.155.x.x     crowdsecurity/http-probing 24h  community
Enrolling in the CrowdSec Console
The app.crowdsec.net console allows you to visualize alerts, manage decisions and access community threat lists (CTI).
# 1. Create an account at app.crowdsec.net (free)
# 2. In the console: Security Engines -> Add
# 3. Copy the enrollment command

# On OPNsense (SSH / System -> Shell):
cscli console enroll <your-enroll-key>
# Output: Machine enrolled successfully

# 4. In the CrowdSec console: approve the engine
# Security Engines -> Pending -> Accept

# 5. Verify enrollment:
cscli console status
# Enrollment: OK
# Last heartbeat: <recent timestamp>
Once enrolled, you have access to premium community blocklists and alert history for your OPNsense firewall.
Installing fail2ban on Backend Servers
fail2ban is installed on each Linux server behind OPNsense — where services are actually exposed (SSH, Nginx, web applications).
# Ubuntu/Debian:
sudo apt update && sudo apt install fail2ban -y

# Verify the service:
sudo systemctl status fail2ban
# Active: active (running)

# fail2ban includes default jails.
# Do NOT modify jail.conf directly — create jail.local:
sudo cp /etc/fail2ban/jail.conf /etc/fail2ban/jail.local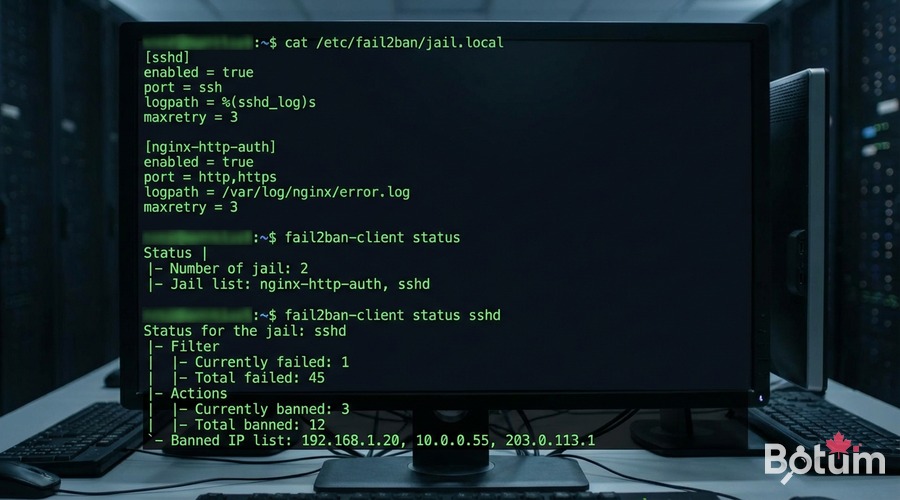
Creating Custom fail2ban Jails
Jails define which services to monitor and the ban rules. I use two main jails on my BOTUM servers: SSH and Nginx.
SSH Jail
# /etc/fail2ban/jail.local

[DEFAULT]
bantime  = 3600          # 1 hour ban
findtime = 600           # 10-minute window
maxretry = 5             # max 5 attempts before ban
backend  = systemd

[sshd]
enabled  = true
port     = ssh           # generic SSH port (or specific number)
filter   = sshd
logpath  = /var/log/auth.log
maxretry = 3             # SSH stricter: 3 attempts
bantime  = 86400         # 24h ban for SSH
Nginx Jail
# /etc/fail2ban/jail.local (continued)

[nginx-http-auth]
enabled  = true
port     = http,https
filter   = nginx-http-auth
logpath  = /var/log/nginx/error.log
maxretry = 5

[nginx-botsearch]
enabled  = true
port     = http,https
filter   = nginx-botsearch
logpath  = /var/log/nginx/access.log
maxretry = 2
bantime  = 86400
# Reload fail2ban after modification:
sudo systemctl reload fail2ban
# or
sudo fail2ban-client reload
# Check jail status:
sudo fail2ban-client status
# Jail list: sshd, nginx-http-auth, nginx-botsearch
sudo fail2ban-client status sshd
# Status for the jail: sshd
# Currently banned: 3
# Total banned: 47
# Banned IP list: 192.168.x.x 45.155.x.x ...fail2ban → CrowdSec Integration
This is where the magic happens: when fail2ban detects a malicious IP, it can report that decision to CrowdSec, which propagates it to the OPNsense bouncer and the global community.
# Install the CrowdSec plugin for fail2ban:
# On the backend server (not OPNsense):
curl -s https://packagecloud.io/install/repositories/crowdsec/crowdsec/script.deb.sh | sudo bash
sudo apt install crowdsec -y

# Enroll this server in the CrowdSec console:
sudo cscli console enroll <your-enroll-key>

# Configure the fail2ban action to notify CrowdSec:
# /etc/fail2ban/action.d/crowdsec.conf
[Definition]
actionban   = cscli decisions add --ip <ip> --duration 4h --reason "fail2ban-<name>"
actionunban = cscli decisions delete --ip <ip>

# Enable the action in jail.local:
# [DEFAULT]
# action = %(action_)s
#          crowdsec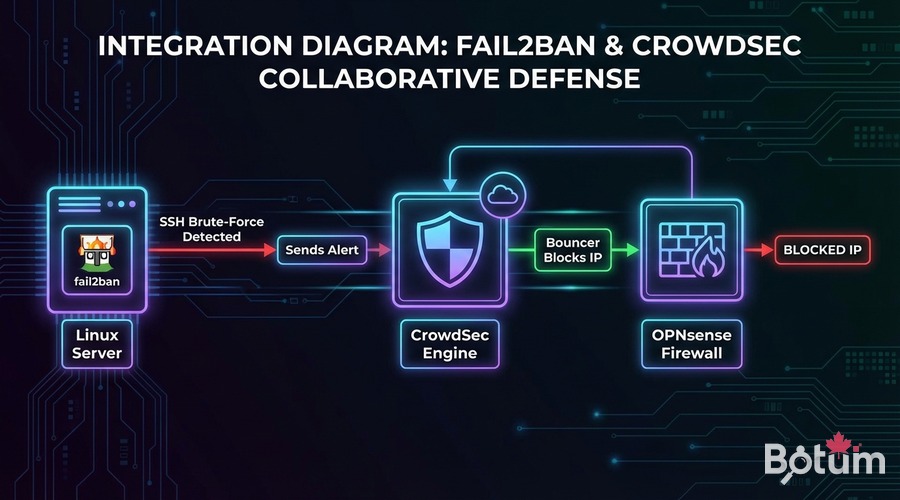
With this integration, the protection flow becomes:
- Bot attempts SSH brute-force on the backend server
- fail2ban detects after 3 attempts and bans the IP locally
- fail2ban sends the decision to CrowdSec via
cscli - CrowdSec propagates the decision to the OPNsense bouncer
- OPNsense blocks the IP at the firewall level for all services
- The IP is contributed to the global CrowdSec community
Monitoring: Logs, Dashboard, Alerts
Two levels of monitoring are available: local via CLI and centralized via the CrowdSec console.
Local Monitoring (CLI)
# On OPNsense (SSH):
# View real-time alerts:
cscli alerts list
# View active decisions:
cscli decisions list
# View agent metrics:
cscli metrics
# On backend server:
# fail2ban logs in real-time:
sudo tail -f /var/log/fail2ban.log
# Recent bans:
sudo fail2ban-client status sshd
# Manually unban an IP (if false positive):
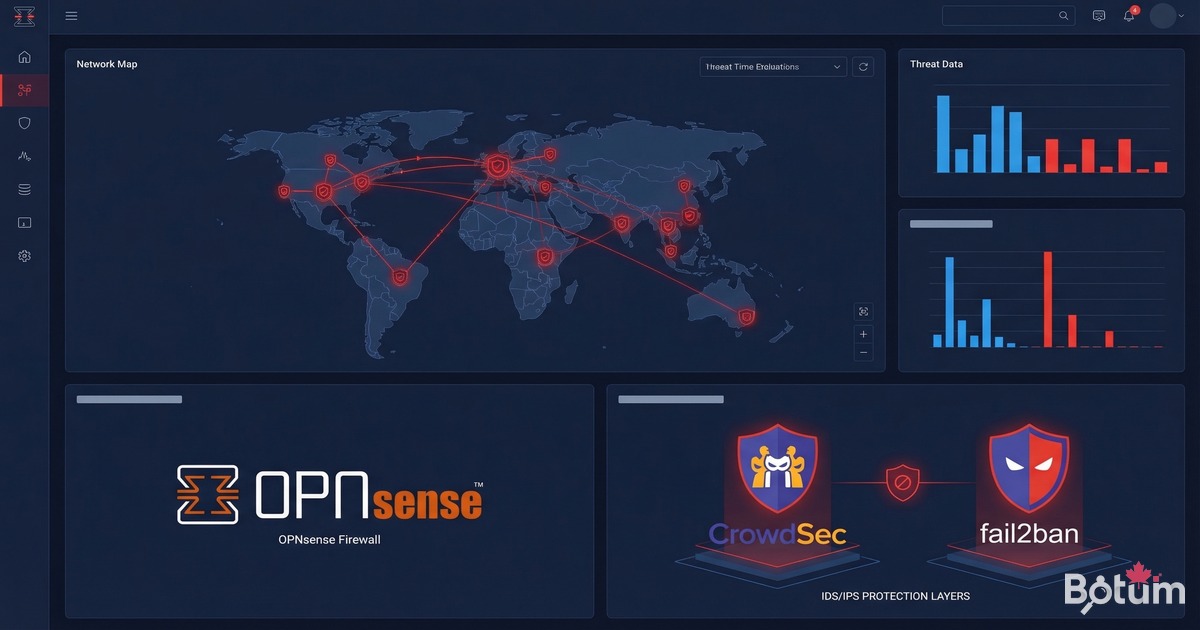
sudo fail2ban-client set sshd unbanip 192.168.10.50CrowdSec Console (Web Dashboard)
# app.crowdsec.net -> Dashboard
# - World map of blocked attacks
# - Alert timeline by type (SSH, HTTP, scan...)
# - Machine list (OPNsense + backend servers)
# - CTI: IP reputation with context
# - Premium blocklists (optional subscription)

# Receive Telegram/Slack/Email alerts:
# Console -> Settings -> Notifications
# Configure webhook or email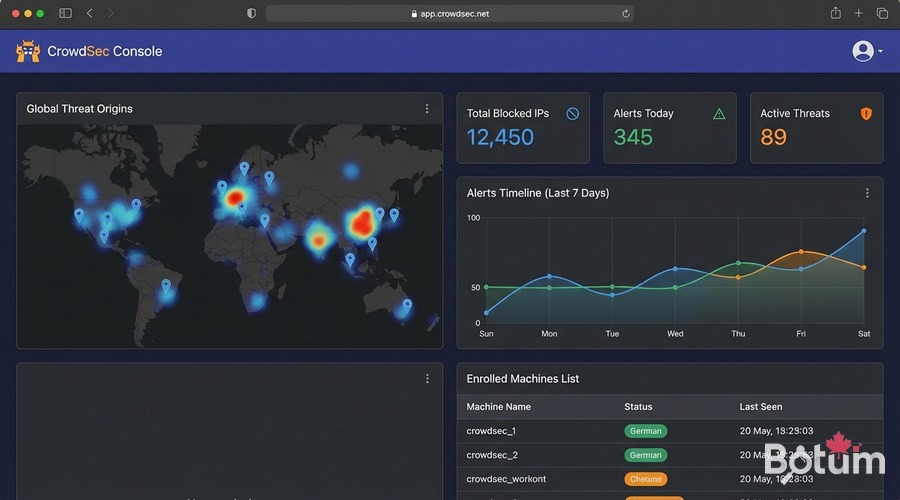
Validation Tests
# 1. Verify CrowdSec active on OPNsense:
cscli version && cscli machines list

# 2. Simulate an SSH attack from an external IP:
# (on a test server outside BOTUM network)
for i in {1..5}; do ssh invalid_user@<server-IP> 2>/dev/null; done
# -> fail2ban should ban the test IP

# 3. Verify the ban:
sudo fail2ban-client status sshd
# Test IP should appear in "Banned IP list"

# 4. Verify propagation to OPNsense:
# SSH OPNsense -> cscli decisions list
# Test IP should appear if integration is active

# 5. False positive test (cleanup):
sudo fail2ban-client set sshd unbanip <your-test-IP>
cscli decisions delete --ip <your-test-IP>
Result: Complete Security Stack
By combining CrowdSec and fail2ban on BOTUM infrastructure, I get:
- Proactive perimeter blocking: CrowdSec blocks known malicious IPs before they reach my servers
- Adaptive local protection: fail2ban bans locally detected attackers
- Shared intelligence: fail2ban detections feed CrowdSec and benefit the entire community
- Centralized visibility: the CrowdSec console aggregates all infrastructure alerts
- Zero cost: this entire stack is open-source and free (CrowdSec community tier)
Téléchargez ce guide en PDF pour le consulter hors ligne.
⬇ Télécharger le guide (PDF)Next Steps — Back to the Hub
This post concludes the OPNsense Enterprise Stack series. The complete stack:
- Post 1: Install OPNsense in Proxmox — router/firewall base
- Post 2: VLANs & Zero Trust — network segmentation
- Post 3: WireGuard VPN & SD-WAN LTE — remote access + failover
- Post 4: WiFi & APs with UniFi/Omada — WiFi segmentation by VLAN
- Post 5 (this post): CrowdSec + fail2ban — collaborative IDS/IPS
→ Return to the OPNsense Enterprise Stack Hub.
🚀 Aller plus loin avec BOTUM
Ce guide couvre les bases. En production, chaque environnement a ses spécificités. Les équipes BOTUM accompagnent les organisations dans le déploiement, la configuration avancée et la sécurisation de leur infrastructure. Si vous avez un projet, parlons-en.
Discuter de votre projet →