Automated OPNsense Config Backup: Never Lose Your Configuration Again
Automate your OPNsense configuration backups to Git, S3, and Proxmox Backup Server. Cron script, REST API, 3-2-1 strategy, and Ansible disaster recovery in under 15 minutes.
On my BOTUM infrastructure, the OPNsense configuration represents weeks of work. A crash, a failed update, or a corrupted VM without backup means starting over from scratch. This guide covers complete OPNsense backup automation: XML, packages, 3-2-1 strategy, and disaster recovery in under 15 minutes.
This article is part of the OPNsense Enterprise Stack series. Find all articles on the OPNsense Enterprise Stack Hub.
Why Back Up Your OPNsense Config
OPNsense stores its entire configuration in a single XML file: /conf/config.xml. This file contains your firewall rules, VLANs, VPN tunnels, SSL certificates, users, and aliases — potentially days of work condensed into a few kilobytes.
Without a backup, a disk crash, failed update, system corruption, or human error can wipe your entire network configuration in seconds. In an SMB or advanced homelab context, that means a complete network outage until everything is manually reconfigured. With 200+ firewall rules and a dozen VLANs, you're looking at an entire day of work.
What to back up:
- config.xml — Complete configuration: rules, interfaces, VPN, certificates, users
- Installed packages — Plugin list (os-zerotier, os-wireguard, os-acme, etc.) for quick reinstall
- RRD data — Network performance graphs (optional but useful)
- Additional certificates — Included in config.xml but export separately if used in other services
The good news: OPNsense exposes a complete REST API that allows full automation of this process — no third-party plugins, no SSH access required, in a few lines of bash.
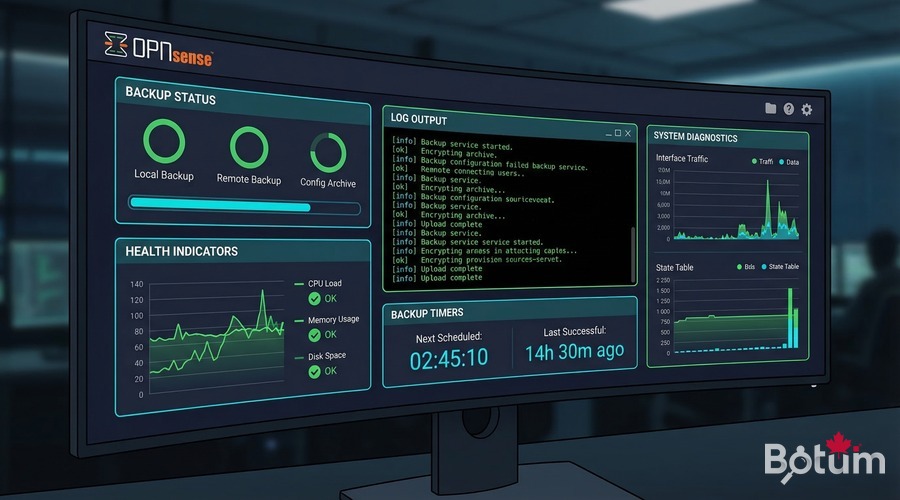
Manual Backup via the OPNsense Interface
Before automating, understanding the manual backup is essential. In the OPNsense interface, navigate to Diagnostics → Backup.
Three main options:
- Download configuration as XML: downloads the complete config.xml, encrypted or not
- Include extra data: includes RRD data (performance graphs)
- Include package info: lists installed packages for documentation
For manual restore, the same interface allows uploading a saved config.xml. OPNsense validates the file and automatically reboots after applying it.
Equivalent cURL command for a quick test:
# One-shot backup via OPNsense API
curl -k -u 'your-apikey:your-apisecret' \
  -o opnsense-backup-$(date +%Y%m%d).xml \
  'https://192.168.1.1/api/core/backup/download/this'
Automating with the OPNsense REST API
The OPNsense REST API is the key to automation. To use it, first create an API key in System → Access → Users → [your user] → API keys. Generate a key/secret pair — keep the secret safe, it's only shown once.
Essential backup endpoints:
# Download current configuration
GET  /api/core/backup/download/this

# List internal OPNsense backups
GET  /api/core/backup/list

# Restore a backup by ID
POST /api/core/backup/revertto/{backup_id}

# Delete a backup by ID
POST /api/core/backup/deleteback/{backup_id}
Authentication uses HTTP Basic Auth with your API key and secret. Never your admin password — API keys are individually revocable without affecting admin access.
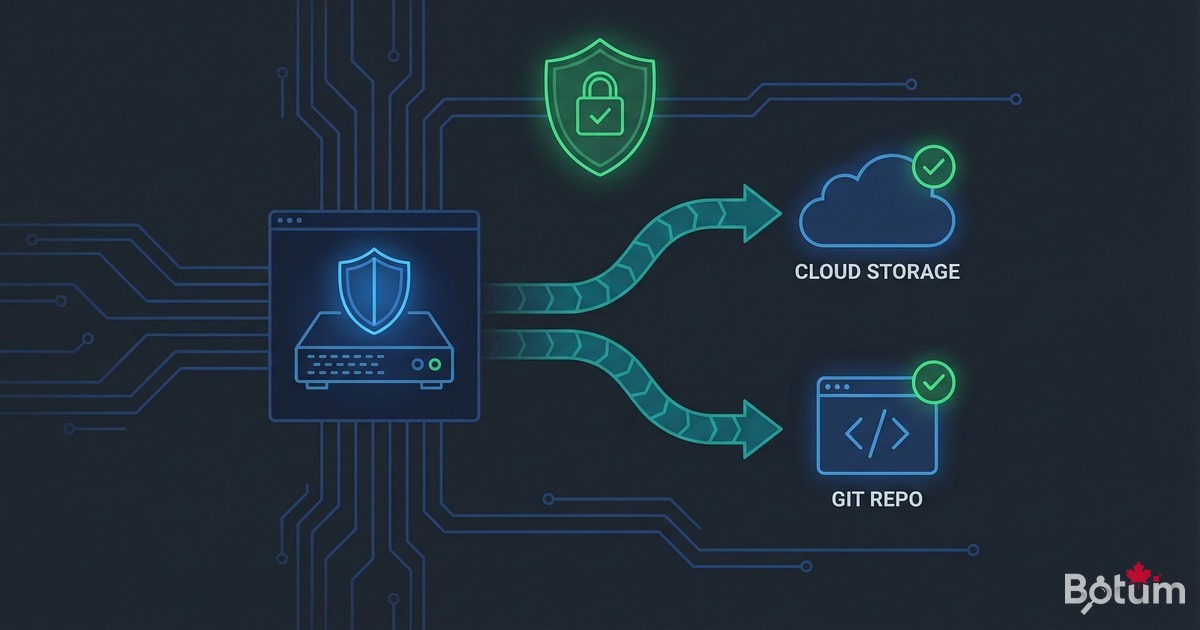
Daily Backup Script to Private Git Repo
Storing OPNsense config in a private Git repo offers unique advantages: complete history of every change, readable diff between versions (who changed which rule and when), instant rollback to any past state, and audit trail for compliance.
#!/bin/bash
# /usr/local/bin/opnsense-backup.sh
# Daily OPNsense backup to private Git
set -euo pipefail

OPNSENSE_HOST='192.168.1.1'
API_KEY='your-api-key'
API_SECRET='your-api-secret'
BACKUP_DIR='/opt/opnsense-backups'
GIT_REPO='git@github.com:yourorg/opnsense-configs.git'
DATE=$(date +%Y-%m-%d_%H-%M)
LOG='/var/log/opnsense-backup.log'

log() { echo "[$(date '+%Y-%m-%d %H:%M:%S')] $*" | tee -a "$LOG"; }

# Initialize repo if needed
if [ ! -d "$BACKUP_DIR/.git" ]; then
  git clone "$GIT_REPO" "$BACKUP_DIR"
  log "Repo initialized"
fi

cd "$BACKUP_DIR"
git pull --rebase origin main

# Download XML config
curl -sk -u "${API_KEY}:${API_SECRET}" \
  "https://${OPNSENSE_HOST}/api/core/backup/download/this" \
  -o "config-${DATE}.xml"

# Validate it's a real OPNsense XML
if ! grep -q '' "config-${DATE}.xml" 2>/dev/null; then
  log "ERROR: invalid config.xml, backup cancelled"
  rm -f "config-${DATE}.xml"
  exit 1
fi

# Symlink to latest
ln -sf "config-${DATE}.xml" config-latest.xml

# Commit and push (only if changes)
git add -A
if ! git diff --staged --quiet; then
  git commit -m "backup: ${DATE} [auto]"
  git push origin main
  log "Backup pushed to Git: config-${DATE}.xml"
else
  log "No changes since last backup"
fi

# Rotation: keep last 30 XML files
ls -t config-20*.xml 2>/dev/null | tail -n +31 | xargs -r rm -f
git add -A
git diff --staged --quiet || git commit -m "rotation: old backups cleanup"
git push origin main 2>/dev/null || true
Add to cron for daily execution at 2:00 AM:
# crontab -e (as root)
0 2 * * * /usr/local/bin/opnsense-backup.sh >> /var/log/opnsense-backup.log 2>&1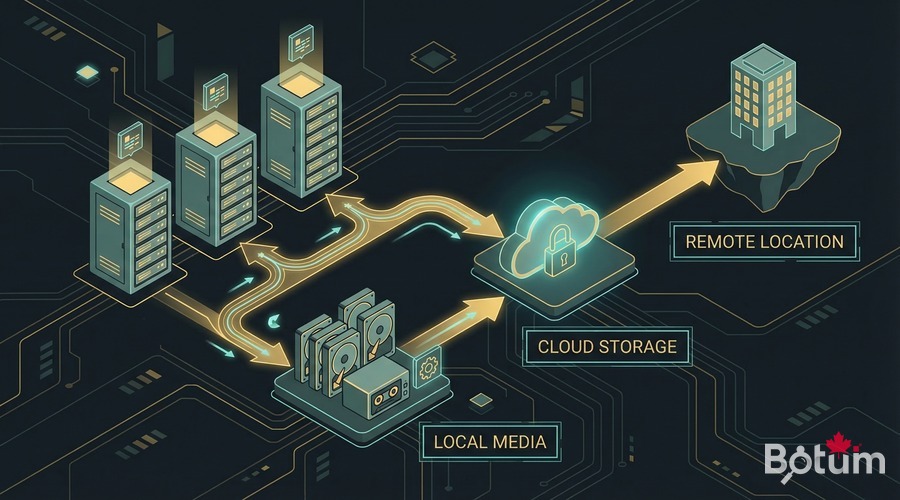
Remote Storage Backup (S3, SFTP, PBS)
Local Git is a first layer, but it doesn't protect against physical server loss or a datacenter fire. Offsite backup is mandatory.
Option A — Amazon S3 (or compatible: Wasabi, MinIO)
# Install aws-cli on the backup server
apt install awscli -y
aws configure  # enter key ID, secret, region

# Add to opnsense-backup.sh after Git commit:
aws s3 cp "config-${DATE}.xml" \
  s3://my-backup-bucket/opnsense/config-${DATE}.xml \
  --storage-class STANDARD_IA

# S3 Lifecycle policy: 90-day automatic retention
Option B — SFTP to NAS or remote server
# Generate passphrase-free SSH key for automation
ssh-keygen -t ed25519 -f ~/.ssh/backup_opnsense -N ''
ssh-copy-id -i ~/.ssh/backup_opnsense.pub backup@nas.local

# In opnsense-backup.sh:
sftp -i ~/.ssh/backup_opnsense -b - backup@nas.local <
Option C — Proxmox Backup Server (PBS)
If your OPNsense runs as a Proxmox VM (see Episode 1 of the series), PBS can back up the entire VM automatically via Proxmox snapshots. This is the most comprehensive solution: consistent VM-level snapshots, restore in 5 minutes.
# In Proxmox: configure backup job for OPNsense VM
# Datacenter → Backup → Add job
# Storage: PBS, Mode: snapshot, Schedule: daily 03:00
The 3-2-1 Strategy Applied to OPNsense
The 3-2-1 strategy is the industry gold standard for professional backups. Applied to OPNsense, here's the concrete implementation:
- 3 copies: config.xml on local server + private Git repo + S3 bucket
- 2 different media: local disk storage + cloud object storage
- 1 offsite: S3 in a different region, or SFTP to a remote server
My recommended configuration for an SMB:
# Recommended frequencies
Local Git backup    : daily at 2:00 AM (cron)
S3 push             : integrated in Git script (automatic)
PBS/Proxmox snapshot: weekly (Sunday 3:00 AM)
Restore test        : quarterly (scheduled in calendar)
Estimated monthly cost: < $3/month on S3 Standard-IA for 90 days of OPNsense backups (XML files = a few hundred KB).
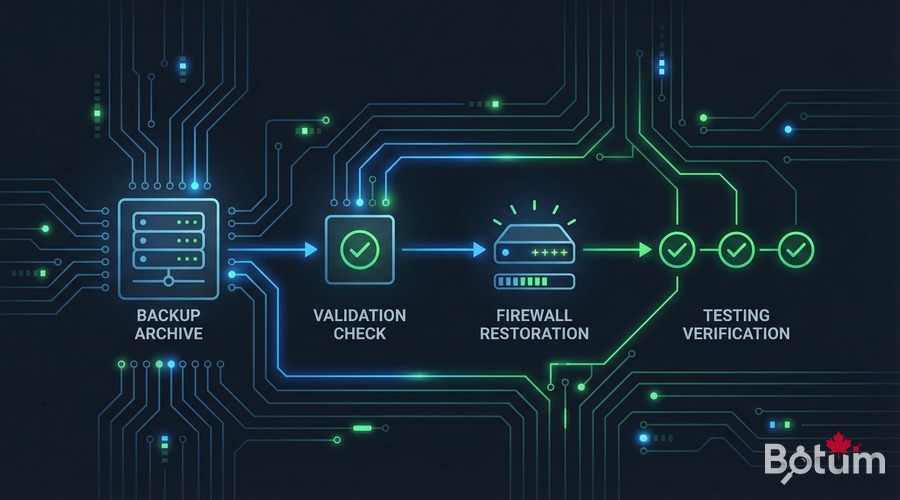
Testing Restore: Complete Procedure
An untested backup is a useless backup. I recommend testing the complete restore at least once per quarter, ideally on a test OPNsense in a separate Proxmox VM.
Method 1 — Via web interface
- Log in to OPNsense → Diagnostics → Backup
- "Restore" section → click "Browse" → choose saved config.xml file
- Check "Reboot after restore" → click "Restore configuration"
- Wait for reboot (~2 minutes) → reconnect to interface
- Verify rules, VLANs, VPN
Method 2 — Via REST API
# Upload and restore via API
curl -k -u 'apikey:apisecret' \
  -X POST \
  -F 'conffile=@/opt/opnsense-backups/config-latest.xml' \
  'https://192.168.1.1/api/core/backup/restore'

# Check status after reboot
curl -k -u 'apikey:apisecret' \
  'https://192.168.1.1/api/core/firmware/status'
Post-restore verification checklist:
- ☑ Firewall rules active (LAN → WAN working)
- ☑ VLANs present and properly routed
- ☑ WireGuard / OpenVPN tunnels active
- ☑ DHCP distributing correct ranges per VLAN
- ☑ DNS Unbound resolving local names
- ☑ SSL certificates still valid
- ☑ Suricata/CrowdSec active if deployed
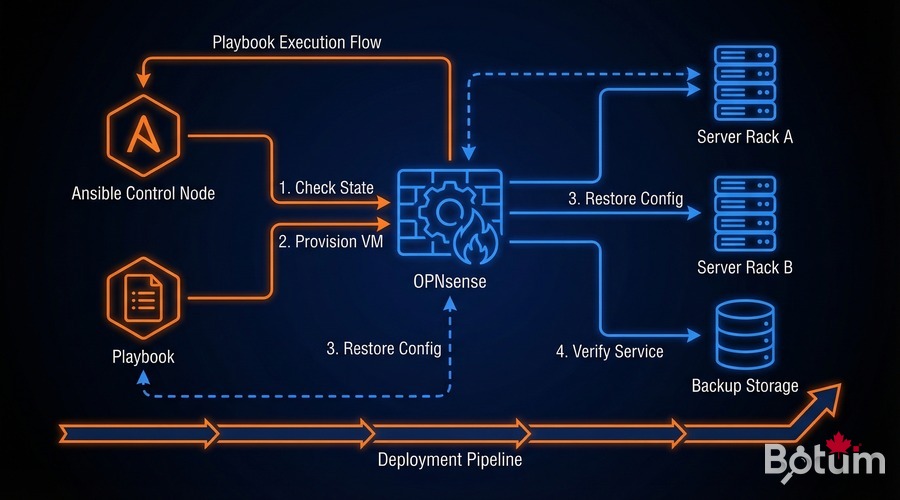
Ansible Integration for < 15-Min Disaster Recovery
In Episode 12, we saw how to deploy and configure OPNsense entirely with Ansible. The combination of automated backup + Ansible playbooks enables a complete disaster recovery in under 15 minutes — even on brand new hardware.
The disaster recovery playbook:
# playbook-opnsense-dr.yml
---
- name: OPNsense Disaster Recovery
  hosts: opnsense_new
  gather_facts: false
  vars:
    backup_source: 'git@github.com:yourorg/opnsense-configs.git'
    backup_file: 'config-latest.xml'

  tasks:
    - name: Clone backup repository
      git:
        repo: '{{ backup_source }}'
        dest: /tmp/opnsense-backup
        version: main

    - name: Restore OPNsense configuration
      uri:
        url: 'https://{{ inventory_hostname }}/api/core/backup/restore'
        method: POST
        url_username: '{{ api_key }}'
        url_password: '{{ api_secret }}'
        body_format: form-multipart
        body:
          conffile:
            content: '{{ lookup("file", "/tmp/opnsense-backup/" + backup_file) }}'
            filename: 'config.xml'
        validate_certs: false
      register: restore_result

    - name: Wait for OPNsense reboot
      wait_for:
        host: '{{ inventory_hostname }}'
        port: 443
        delay: 30
        timeout: 300

    - name: Verify firewall rules
      uri:
        url: 'https://{{ inventory_hostname }}/api/firewall/filter/searchrule'
        url_username: '{{ api_key }}'
        url_password: '{{ api_secret }}'
        validate_certs: false
      register: rules_check

    - name: Final report
      debug:
        msg: "OPNsense restored with {{ rules_check.json.rowCount }} firewall rules"
Typical disaster recovery timeline with this approach:
- 0-5 min: Fresh OPNsense install on hardware/VM + initial WebUI access
- 5-8 min:
ansible-playbook playbook-opnsense-dr.yml— restore config + reboot - 8-12 min: Automated verification (rules, VPN, DHCP)
- 12-15 min: Manual tests + operational confirmation
Estimated time: ~12 minutes with an up-to-date Git backup. Well within the 15-minute target.
Conclusion: Your Network Safety Net
The OPNsense backup strategy we've just implemented — automated XML backup via REST API, Git versioning, S3 replication, 3-2-1 strategy, and Ansible disaster recovery — transforms a fragile configuration into a resilient infrastructure.
Implementation time: 2-3 hours. The payoff: sleeping soundly knowing that even in a catastrophic scenario, the network will be back online in under 15 minutes.
In Episode 14, we'll move on to securing access with Let's Encrypt ACME — no more self-signed certificates on your OPNsense interface, and wildcard certificates for all your internal services.
Téléchargez ce guide en PDF pour le consulter hors ligne.
⬇ Télécharger le guide (PDF)🚀 Aller plus loin avec BOTUM
Ce guide couvre les bases. En production, chaque environnement a ses spécificités. Les équipes BOTUM accompagnent les organisations dans le déploiement, la configuration avancée et la sécurisation de leur infrastructure. Si vous avez un projet, parlons-en.
Discuter de votre projet →